HEADER PHOTO BY JOHN ENTWISTLE / WHISTLER BLACKCOMB
Editor’s Note: This post was originally written in 2018 but was updated in May 2025 to reflect new operations. The image we’ve used for the header is what the suspension bridge typically looks like in late July / early August.
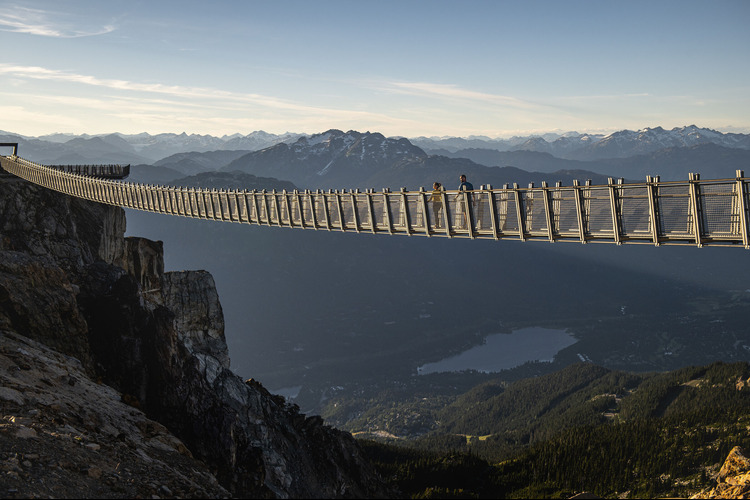
Whistler Peak has always been home to some of the most breathtaking views in town. I wouldn’t have thought it possible, but Whistler Blackcomb found a way to make your visit to the Peak even more unforgettable – the Cloudraker Skybridge and Raven’s Eye.
Whether you’re an alpine hiking regular or you’re coming for your first visit, you’re going to want to add a trip to the suspension bridge to your summer bucket list. In this blog, we guide you through what you can expect, and we’ve also added a video at the bottom too!
Where is the Cloudraker Skybridge?
The suspension bridge is located right beside the top station of Peak Chair on Whistler Mountain. Access is included in the Summer Alpine Experience Ticket, so you can make this trip part of a full day of adventure. You can also access the Raven’s Eye from the bridge on the West Ridge Lookout.
If you’re travelling with kids, note that the height requirement is 40 inches (3.3 feet / one metre) to ride the Peak Chair and that you can’t ride the chair with a child in any form of carrier. To experience the bridge with your little one, you will have to hike there and back, versus taking the Peak Chair.
When does the Cloudraker Skybridge open?
The Cloudraker Skybridge and Raven’s Eye typically open mid-June, but as this is a mountain-based, outdoor activity, its opening date is weather permitting. Always check the Hours of Operation page before planning your visit, just to make sure. It’s usually open until the middle of September.
How to Get to Cloudraker Skybridge
From the valley, you can either upload using the Blackcomb Gondola in the Upper Village and head across the PEAK 2 PEAK, or take the Whistler Village Gondola as the bridge is on Whistler Mountain at the top of Peak Express chair (a fun trip up in itself).

Good to Know – Hiking to and from the Roundhouse
It takes approximately 10 to 20 minutes to hike the Peak Express Traverse from the Roundhouse down to the base of the Peak Chair.
There are two options for your return, and they both require some hiking. You can either take one of the alpine hiking trails for additional views or download via the Peak Chair. If you choose to download the Peak Chair, it is important to note that you will still have to walk back up the Peak Express Traverse from the base of the Peak Chair to the Roundhouse to get home.
At 0.6 kilometres, it is not a great distance, but it is uphill all the way with an elevation gain of 63 metres (207 feet). Depending on the fitness levels and ages of people in your group, this may be challenging after a day of adventuring. Make sure to take water and snacks, leave plenty of time and energy to walk back, and take lots of breaks on your way out.
Take time to review the Whistler Mountain hiking maps before you go so you can plan your day.
What to Wear
When planning for your day, you should plan an outfit not only for style but also for comfort. The alpine is typically a few degrees colder than in Whistler Village (see the village vs alpine weather forecast here), so make sure to pack layers, and remember to wear good shoes suitable for hiking.
For full advice on what to wear, check out this article on hiking gear. Bring a reusable water bottle and use the free refilling stations at the Roundhouse and Rendezvous to make sure you stay hydrated.
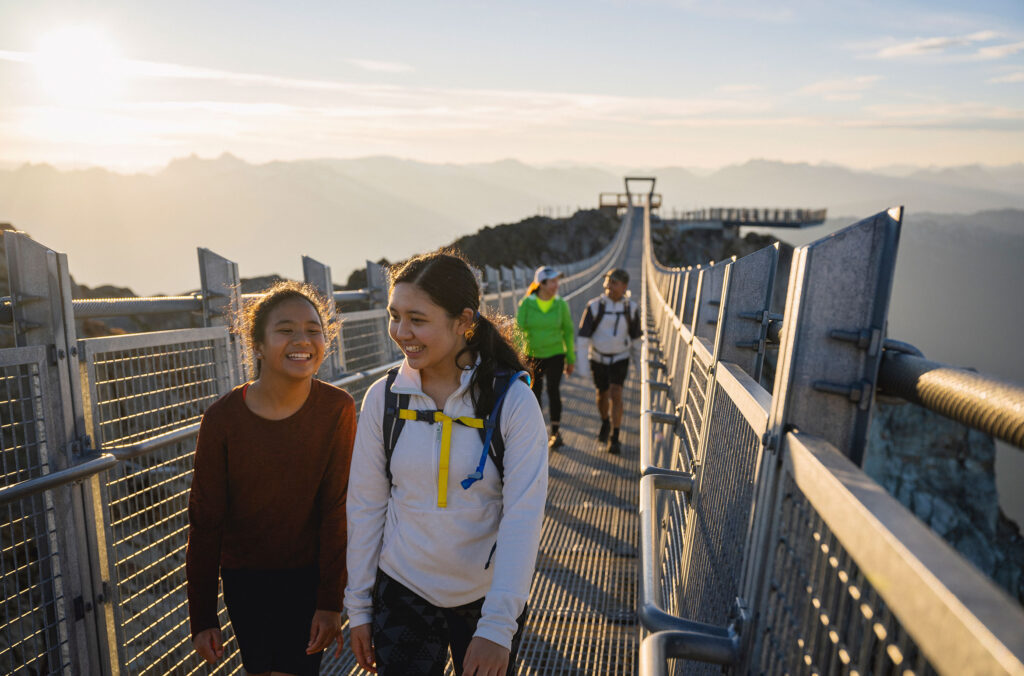
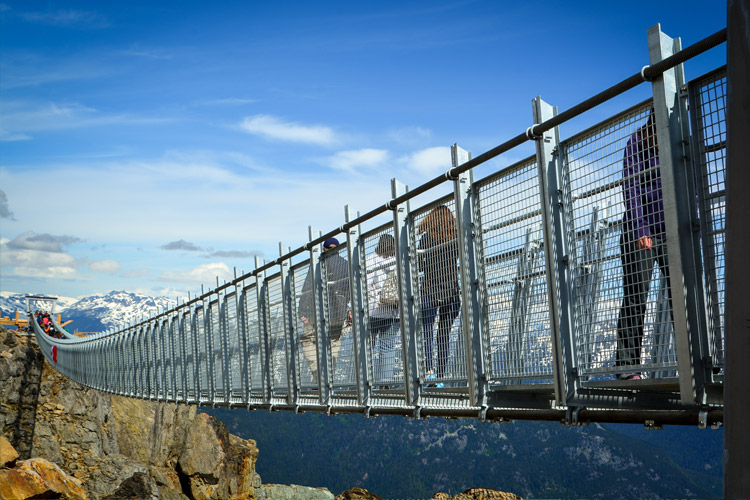
What it’s Like to Walk the Bridge
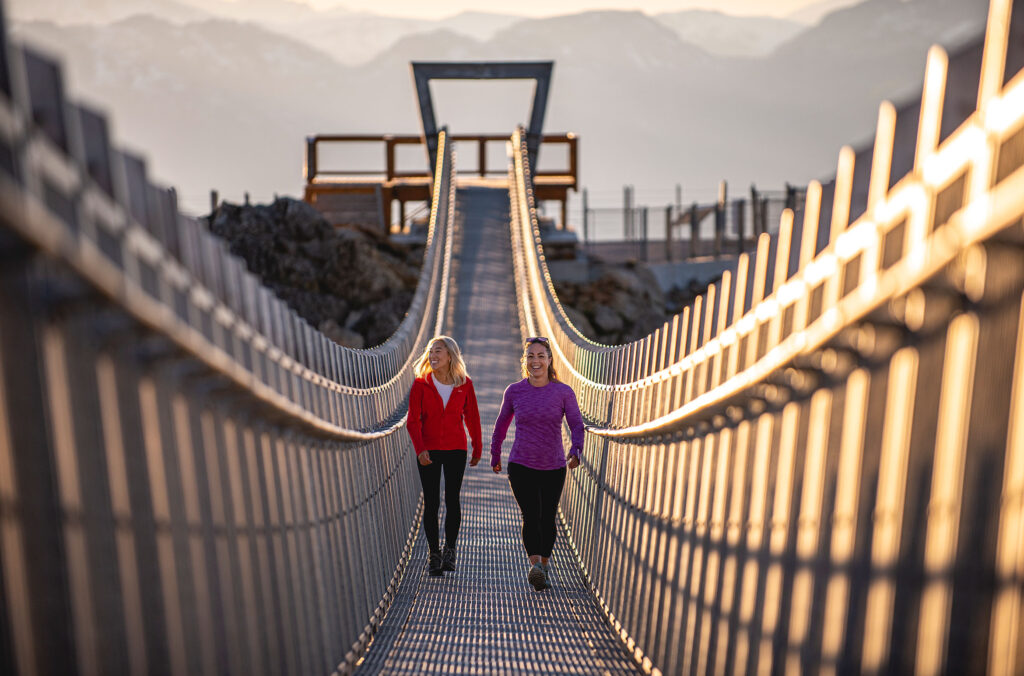
I really like this bridge because of its easy access and stunning views. The design of the bridge feels very secure with fully closed sides and small holes on the bottom grating. I will note that it does sway a bit when walking – not enough for me to find it scary, but good to know before you get on.
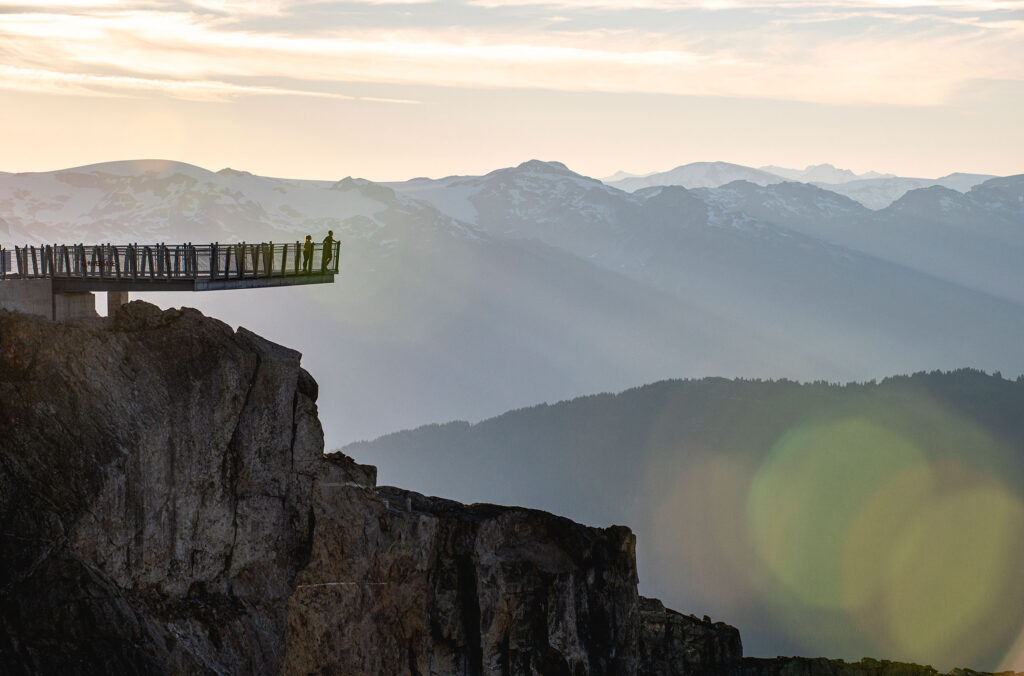
The bridge is 130 metres (427 feet) long, spanning Whistler Peak to the West Ridge, crossing high above Whistler Bowl. The Raven’s Eye is a cantilevered viewing platform that extends 12.5 metres (41 feet) out from the West Ridge, with exhilarating, 360-degree views.
If you’re not big on heights, you can still check out the bridge from solid ground and enjoy the endless views from the Peak.
When to Go
The Cloudraker Skybridge and Raven’s Eye open in the summer, typically in mid-June (there’s currently no winter access), and the typical hours are 11 AM to 5 PM on weekends and 4 PM on weekdays. I recommend starting your day early for the best experience. There will be fewer people up top, and the light will be better for photos.
Remember to check the hours of operation before planning your day, and check out our guide to alpine sightseeing for more handy tips and an FAQ. Although tickets for the Summer Alpine Experience never sell out, it can’t hurt to get them early, so all you need to do is pick them up when you get here. You can book them via Whistler.com or by calling 1-800-944-7853.
More to Explore
The suspension bridge is only one of many incredible experiences on the mountain. Here are a few other activities you’ll love:
- Take a photo with the Peak Inukshuk
- Enjoy an alpine hike
- Soar between mountains on the PEAK 2 PEAK Gondola
- And even more summer alpine activities, from glacier glissading to the Via Ferrata.
Stay in the loop of the latest updates by connecting to @GoWhistler on social media, by subscribing to our email newsletter, or checking out the summer information on Whistler.com.
Save up to 20% on lodging with Whistler.com this summer. Stay & Golf from $289 CAD per person, per night or Stay & Bike from $179 CAD per person, per night. Sign up to be a Rewards by Whistler.com Member and receive a FREE $50 CAD activity voucher on stays of 3+ nights.
You can also win a summer trip to Whistler with the Escape the Ordinary contest!